Install Android SDK/ADT Bundle on Ubuntu [Complete Guide]

Android SDK/ADT Installation on Ubuntu (64-bit) #
Android SDK/ADT is a development platform for Android OS, enabling developers to build applications for Android devices. This tutorial walks through installing the Android SDK/ADT Bundle on Ubuntu. This guide uses Ubuntu 13.04 (64-bit, Intel Core i5 2450M @ 2.50GHz x4).
You can check your OS version using:
lsb_release -aTo check your Linux distribution type:
file /sbin/init1. Install Required 32-bit Libraries #
Android SDK is 32-bit, so if you’re using a 64-bit OS, install the necessary 32-bit compatibility libraries.
For Ubuntu 12.04:
sudo apt-get install ia32-libsFor Ubuntu 13.04:
sudo apt-get install libc6-i386 lib32stdc++6 lib32gcc1 lib32ncurses5For Ubuntu 13.10:
sudo apt-get install libc6-i386 lib32stdc++6 lib32gcc1 lib32ncurses5 lib32z12. Install JDK (Java Development Kit) #
If you haven’t installed the JDK yet, you can install it via terminal:
sudo apt-get update
sudo apt-get install openjdk-7-jdk
Verify the installation:
java -version3. Download the Android SDK or ADT Bundle #
To download using the terminal:
wget http://dl.google.com/android/android-sdk_r20-linux.tgz
wget http://dl.google.com/android/adt/22.6.2/adt-bundle-linux-x86_64-20140321.zip
Alternatively, visit: Android Developer Downloads
Tip: The ADT Bundle includes Eclipse IDE and the SDK. If you already have a development environment, downloading only the SDK is sufficient.
4. Extract the SDK/ADT Bundle #
For SDK:
tar -xvzf android-sdk_r20-linux.tgzFor ADT Bundle:
sudo apt-get install unzip
unzip file.zip -d destination_folder
Or simply right-click and select “Extract here”.
5. Navigate to the SDK Tools Directory #
Use the cd command to switch to the tools directory.
If you downloaded the ADT bundle:
cd ~/program/adt-bundle-linux-x86_64-20140321/sdk/toolsIf you downloaded the SDK:
cd ~/android-sdk-linux/tools6. Launch the Android SDK Manager #
Run the following command:
./androidThis opens the Android SDK Manager to install updates and tools.
7. Add Android SDK to System PATH #
Edit .bashrc by running:
gedit ~/.bashrcAdd the following lines to the bottom of the file:
For SDK installed via direct download:
export PATH=${PATH}:~/android-sdk-linux/tools
export PATH=${PATH}:~/android-sdk-linux/platform-tools
For SDK inside ADT Bundle in the program directory:
export PATH=${PATH}:~/program/adt-bundle-linux-x86_64-20140321/sdk/tools
export PATH=${PATH}:~/program/adt-bundle-linux-x86_64-20140321/sdk
Save the file and close the editor.
8. Apply Changes and Launch AVD Manager #
Log out and log back in, or run:
source ~/.bashrcThen open the Android Virtual Device Manager:
android avd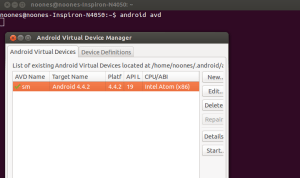
Use the interface to create and manage Android Virtual Devices (AVDs).
You have now successfully installed the Android SDK/ADT Bundle on Ubuntu. You’re ready to start developing Android applications!